Hello Everyone!
I'm typing with one finger seriously bandaged so is going a bit slower than usual, but will do my best.
This post is about the Monster Hutch I showed in my
last post which looked like this...a much desperately needed makeover. I wasn't really in the mood but had no choice. But it is done, and there are lots of pics and I will show how I did it trying to use the famous chalk paint without having tried the original one by Annie Sloan which I do intend to one day. But this is how to do it with what one has.
These are the before and after. If you are interested in how I did it, please read on. Warning, lots of pics LOL.


One thing I knew was that regular paint was not for me, since I did use chalk paint on my
garden gate
and I loved it. I've seen what so many women are doing using chalk paints for their furniture giving average pieces some serious upgrading and artistic touches. I especially love what they are doing with so many hutches or armoires like this one above.
After searching with no luck for 2 weeks, on the day I needed to work on the items going into the armoire, I got back online and found one for $60.dollars on Craigslist. I knew when I finished with my room makeover I wanted to put as much ''away'' as possible, to keep my things clear of dust and to have an easy on the eye simplicity in the room. The hutch or cabinet was the way to go. I lucked out that morning at the last minute, with this one. It has pretty little legs, a light inside, good hardware, a few nice details, but the price was best.


So. the first thing was to decide what colors, and that was easy because
my entire room is based on whites, silver and pink. I already had
palest grey for the walls in a fresh can by Olympic called "Moondance"
and for pink I'd have to mix some red into it to get a shade I
liked. Mixing the red with the grey was good because I wanted a muted
shade of pink, not a bright one which is what would happen with red mixed into white. I mixed an old bottle of acrylic engine red
by the drops, with the grey till I got the shade of pink I wanted, then I mixed in some
plaster of paris, about a third to the amount of paint and mixed very
very well. It thickened up a bit and then I added tablespoons of water
as needed to get a nice thick kind of silky paint consistency. I found
that after a few minutes I'd have to add more water as it thickened up
as I used it but only for the first 15 minutes or so. I began painting the
inside with this and let me tell you it did not look promising!
It was
very streaky and I thought I'd made a mistake.
I got scared and left it.
What a disaster! Nobody says how bad this is going to look with just one coat! Also you can not go over the same places more than a few strokes because it then begins to peel off.
So I got nervous and let me tell you it was a scary thing after all the work I've been doing to come across something that was NOT going to work out as everyone said! So I left it as I researched some more, and did not have the stomach to see it again, until the next day. When I saw it dry, I saw how much blended it became, all by itself! and so I decided to finish the first coat on the rest of the inside.
After that first coat dried, hours later I did a second coat and from the first stoke I could see complete coverage and thought how
relieved! nice that something was actually working out as it was supposed to! I got heartened and finished up the inside of the top part.
This first below is with the inside light on, the next one it is off. This is just 2 coats of the chalk paint. I did touch ups here and there.
Nice huh?

This bottom one, the bottom part of the hutch has only one coat. You can see the difference. Also because I didn't put enough red in, but the 2nd coat I mixed more red and it matches better when dry.

Drawers with one coat.....
...with 2 coats.......coverage is good with two coats once the first has dried. It was scarey before ! LOL
Bottom inside with 2 coats.........
Inside all done with 2 coats of the mixed paint.....engine red drops into "Moondance" grey paint for Pink...
So in between everything I browsed on line for all I could find on those
women using homemade chalk paint to learn all I could, I read their how
to's and read all the comments for all the helpful advise that come in
there too. I kept learning and relearning. I was doing it right, but it
looked terrible. I decided to continue to search online for more
information on chalk paint on furniture of all kinds. And I came across some beauties.
One site in particular was very helpful by
Maison Decor and her helpful hints which I definitely would pay attention to. However, she is describing her experience with Annie Sloan's paints, and I was not using that, so in the texture and mixing etc I was on my own. I had nothing to compare it to because I had never used Annie Sloans paints, so I had to guess what the right consistency was. It turns out to be a matter of preference mostly. But I will surely buy Annie Sloan one day to know what it is really like. But Amy has done some gorgeous pieces!
Some others online....these two below from
here http://lindsayroadvintage.blogspot.com/


these below from http://beautyandbedlam.com/diy-hutch-redo-before-after/
And this below....from
here http://feedingmysunshine.com/before-after-painted-hutch/

And I even found one who had the same exact piece as mine and her version is beautiful too!. She used Annis Sloans' "Duck Egg Blue".
First thing I did when it was in my room was yank out that chicken wire! lol....not for my bedroom....:D
Back to mine....next was to decide on the outside color which I wanted grey but the grey
I had was too light, and the pink needed something more substantial
than the whitish grey, so I had to mix that color too. All I had was
"midnight" in an acrylic which is a deep deep dark blue. I wanted black to
make a true grey but I didn't have it and had to use the "midnight". I
put some "midnight" into the Moondance into the mixing container until I liked the shade.
It is a gorgeous bluish grey. When I look at it, I am very pleased :D
Scary people! One coat is definitely scarey!~~
When it dried it was still too light, so the 2nd coat I had to mix more and made that a bit deeper in grey.
Here I took a shot of the hutch next to the door which is pure white for color comparison.

It dries darker which is good. After this dried I needed to give it some artistic treatments, and give it a light white dry brush wash. I tested this on the panel of the door first with a light dip of dry brush into pure white paint, mostly wiped off and lightly brushed the wood. Then with a clean damp T shirt I rubbed in the light paint and I liked this since it removed brush stoke marks and blended it in, so I went over the entire piece doing this. The "rubbing in" also took off alot of the wet paint too so I had to do it around 4 times over the whole piece, leaving some of it "unwashed", until it had enough of a "white wash" texture to it that I liked. Then I added pure white with a brush to the panels again for extra white and to the trim including the legs. A bit of distressing with sandpaper, more of this and that and rubbing and it was done. I cleaned the hinges and treated them with silver rub n buff including the hardware.
I almost forgot. In the Annie Sloan Chalk Paint world, the process of waxing seems to be critical though I cannot figure out why. Maybe chalk type paint needs a sealant which has been my experience since it scratches easily much more so than plain dried latex. Maybe the waxing process is not just for sheen but more a protection from this easy scratching, I'm not sure yet until I use her brand. But the previous chalk paint I made with baking soda, and this one with plaster of paris is certainly easy to scratch off. So I bought a wax I read was a good substitute for Annie Sloan's, and I got it from Lowes, but when I read the can it has warning as the first thing so I brought it back. I don't need anything toxic in my world. So I decided to make my own furniture paste, or wax. The most basic ingredients seems to be beeswax, oils such a olive, jojoba, coconut, carnauba, and maybe water. I felt confident in this because I will never forget while I was in Bali, and the worker/artisans were crafting their floors and wood for a new building nearby, and the floors were the most beautiful I had ever seen......they were polishing the beautiful raw wood to a most gorgeous sheen using only coconut oil the head manager told me, who was my guide while I stayed at that palace. I will never forget the beauty and efficacy of Nature's simplicity and those who are rewarded with the Beauty of it.
Here, I used what I had which was beeswax, coconut oil, olive and jojoba. I melted the wax first in a double boiler 'system', then added the oils and mixed, then let cool. The end result I wanted creamy so I could just dip my cloth in and get some to wipe on. It involved melting it several times since the beeswax made it harder which meant I kept having to add more oil, such as olive to keep it as a creamier consistency. In the end I would roughly guesstimate I used an ounce of beeswax, half cup each of olive, coconut, and jojoba oils each. I put it into a jar and its lovely to use on my hands! LOL I love when that happens!
I used a soft shoe shine cloth to put onto the hutch. It gave it a beautiful sheen!
The wax gave it a beautiful sheen which seemed to even pearlize the white parts! I didn't do it I promise LOL
the drawer on the right got the wax, and the one on the left didn't...it looks flat.
different angle same thing....

The glass was last to do and I was cleaning it with zest when I sliced my
finger badly and had to stop everything. My housemate was home and I
asked him if he could help finish the 2 panels of glass which he did
with my careful watchful eye over this accident prone person until I
couldn't take it anymore and made him wear gloves. He cleaned the glass
and installed them, with gloves! and then there were the glass shelves
to clean and put in. But glass was not my friend now and I didn't want
to handle them nor did I want John to either since he decided to ignore
my cautions, removed the gloves, and I was in no position to tend to any
accidents on his part so I decided to just cover the glass shelves with
more of the beautiful wrapping paper I have. I guided him to help me
since I had basically one hand, so he was another lol.... we cut the paper, glued them onto the glass, trimmed them, then he carried them in (ceremoniously I might add! lol...I think he felt proud of his new found crafty abilities lol) and put them in...... he said he liked it and so did I. The pale pink paper
complimented the pink interior and broke it up a bit and if the glass
should break it is wrapped. :D For wrapping it all I did was cut
the wrapping paper to its size, and glue with a glue stick to the glass,
and overwrap the paper to stick to the paper on the other side, alot
like wrapping a gift but only on 2 sides and gluing with a glue stick
instead of taping. It looks beautiful.
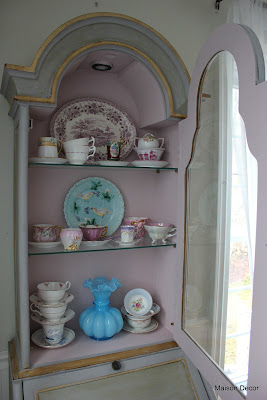
Here it is finished...
Glass shelves wrapped with paper......

And some pretties.....
the light is an oil diffuser and I add pure Lavender essential oil to it every morning and turn the light on....the heat from the light diffuses the scent. Every day I enjoy this scent.
I hope you enjoy your own transformations. I encourage anyone to do it even if it looks scary in the beginning, it will for sure...but keep going, its worth it. Now I have a pretty place to store everything.
Soon in a day or so, the entire room will be done.
blessings.
Sharing this post with
FRENCH COUNTRY COTTAGE: Feathered Nest Friday
and with
The Charm of Home
and with
At The Picket Fence
and with
No Minimalist Here
and with
Shabby Art Boutique
and with
Savvy Southern Style
and with
A Delightsome Life: Home and Garden Thursday
and with
The Shabby Creek Cottage
and with
Shades of Amber


